Showing posts with label Toturials. Show all posts

How to Add Live Chat Support in WordPress


Not every website needs a live chat support. However, you may need a live chat support when you want to sell a service or product on your website, so that your visitors will be able to contact you and ask you about your specific service or product.

Sometimes, a customer may need immediate assistance regarding your services or products. To make this happen, the only way to get in contact with the website team is live chat support. I have experience with website promotion and I found that having a live chat support on an online website increases the position in online market and boosts your products and services sales.

In this tutorial we are going to use Formilla Live Chat plugin. Due to its free features, we’ve chosen this plugin. You can, however, use any plugin of your liking.

Step 1: Plugin Installation

  • Log in to your “WordPress Admin Panel“.
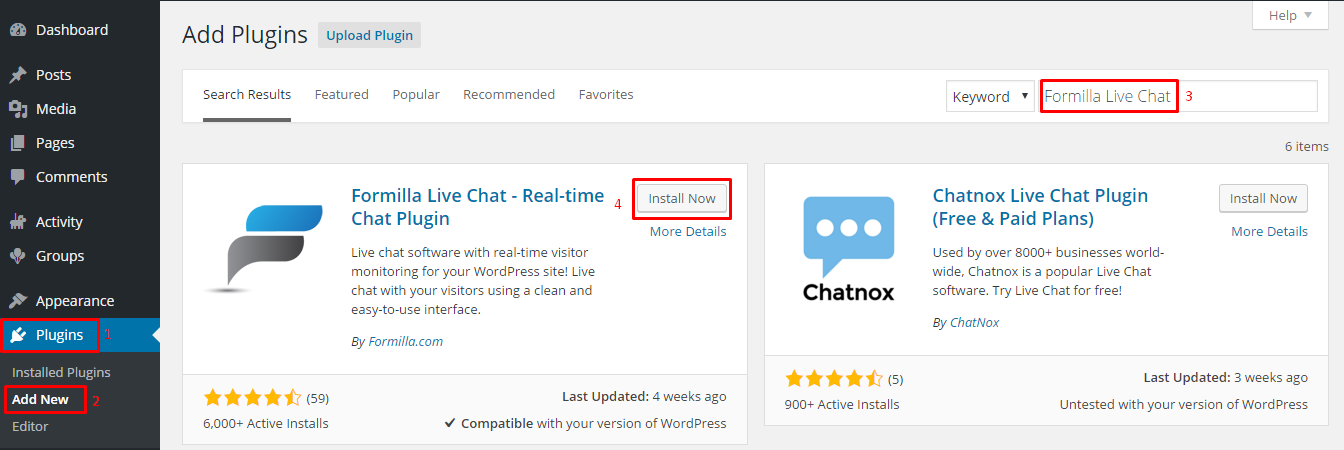
  • Navigate to “Plugins > Add New“.
  • From top right, search for “Formilla Live Chat”.
  • Click on “Install Now” as shown in image.
  • After installing, click on “Activate Plugin


Formilla Live Chat


We’ve downloaded and activated the plugin.
In order to proceed, we’ll have to create an “Account on Formilla“ website.
Within your WordPress Admin Panel.

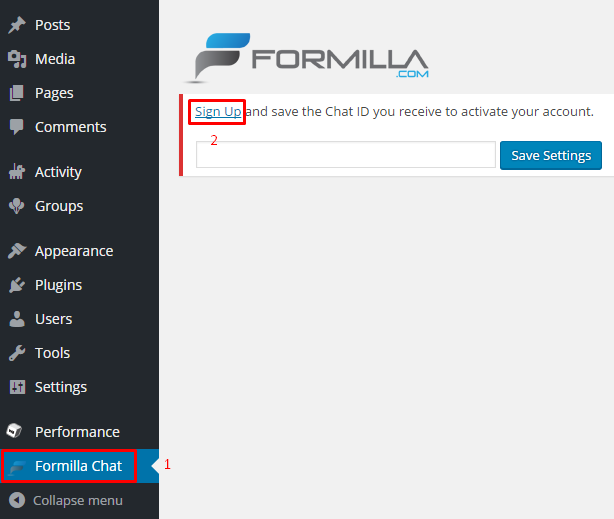
  • Navigate to “Formilla Chat“.
  • Click on “Sign Up“.

Formilla Sign Up

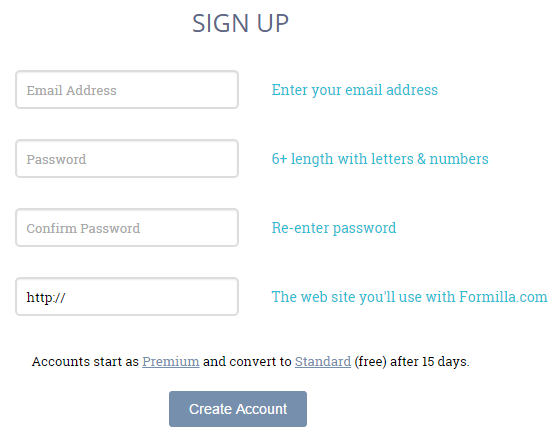
Formilla Sign Up form will be opened.

  • Enter your details.

Sign Up Formilla

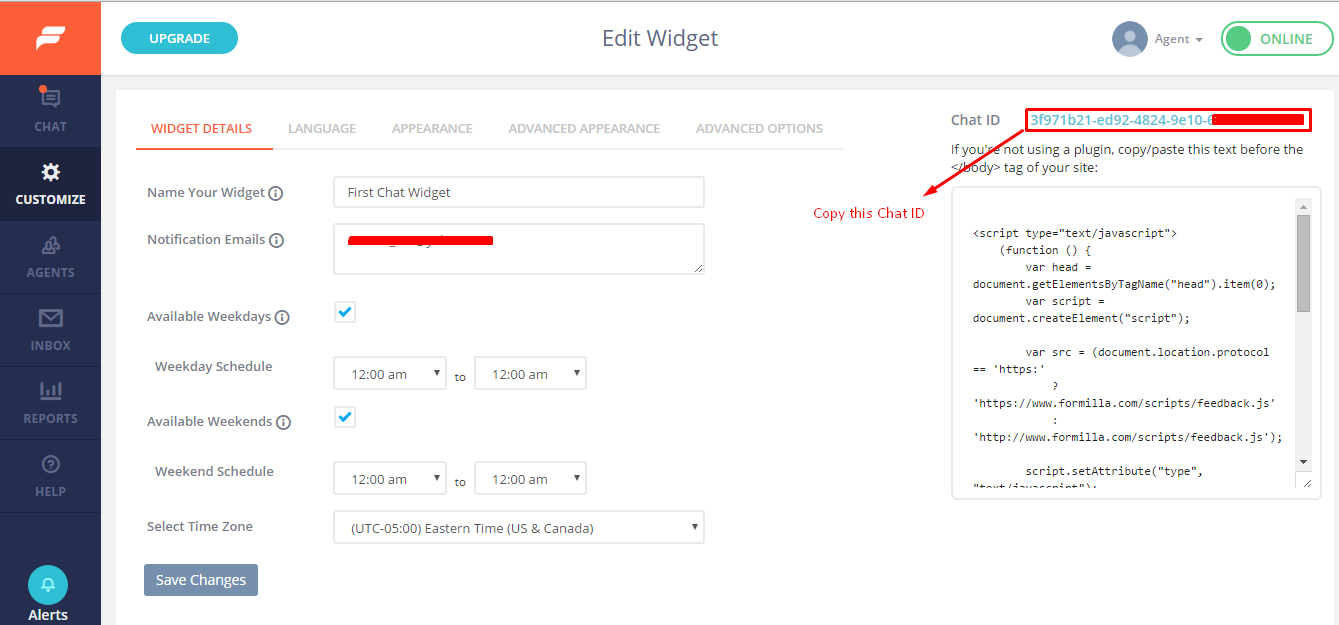
After creating your account, you’ll see something the following screen. You can edit your widget according to your needs.

  • From here, copy your “Chat ID“.

Formilla Chat ID

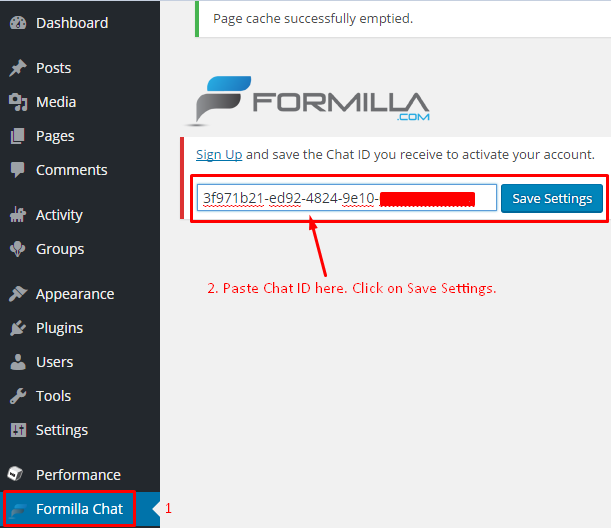
Go back to your “WordPress Admin Panel“.
Navigate to “Formilla Chat“.
Paste “Chat ID“ here.
Click on “Save Settings“.

Formilla Chat ID

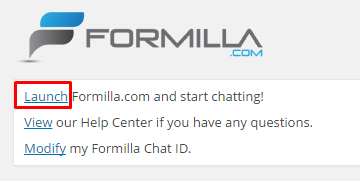
After Saving Settings, You’ll see the below screen.

  • Click on “Launch“.


Formilla Launch

Ok, So now we’ve successfully integrated a “Live Support“ on our WordPress website.

Formilla Chat Panel


or testing purpose, open “Incognito window“ in Chrome. By hitting “Ctrl+Shift+N
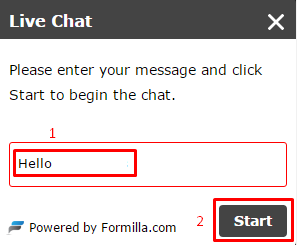
Go to your website. You’ll see a “Chat Box“ at bottom right corner.
Enter your message and click on “Start” to begin the chat.

Live Chat


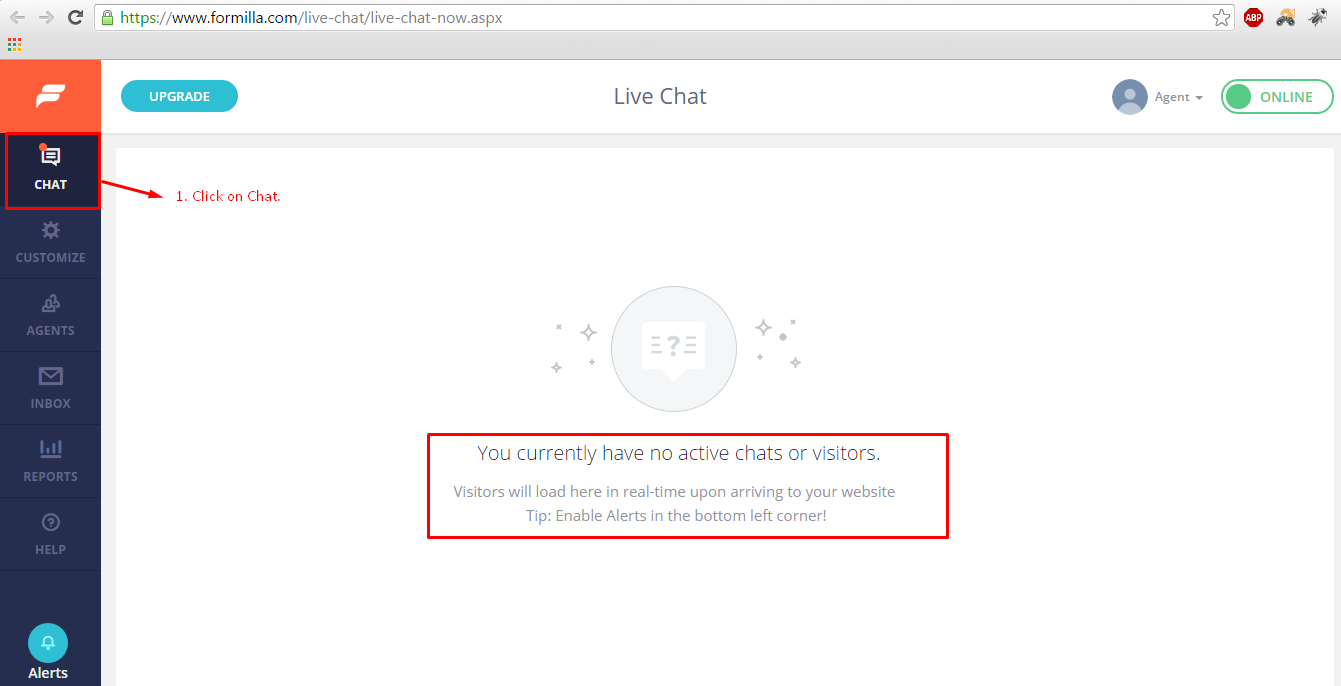
Go back to “Formilla“ website.
Click on “Chat“.
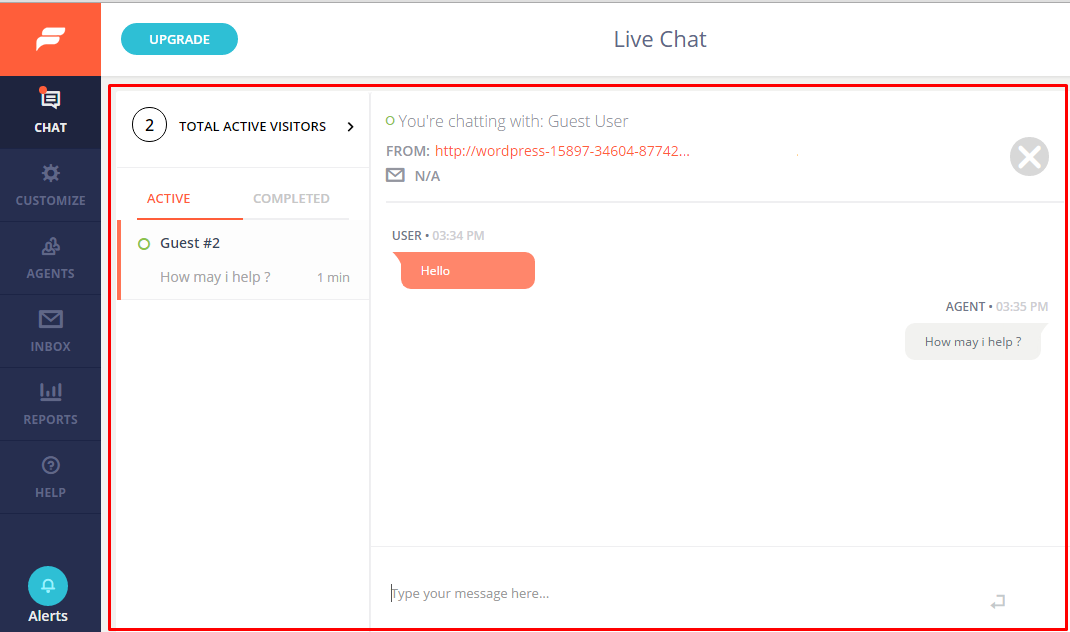
You’ll see “Chat box“ like this.

Formilla Live Chat


And we’re done setting up a live chat support on our WordPress site

How to Add and Improve Readability Score in WordPress Posts


Want to improve the readability of your site? The easiest way to do this is by adding a readability score analysis in WordPress. It allows you to analyze your posts and pages for readability using industry standard tools. In this article, we will show you how to add and improve readability score in WordPress posts.


Adding Readability Score Analysis for WordPress Posts


There are plenty of WordPress plugins that you can use to add readability score in WordPress posts.

If you are already using Yoast SEO plugin, then you are in luck. Yoast SEO comes with a built-in content analysis tool. This tool checks your content’s readability and make suggestions.

As you’re working on your new post, scroll down to the Yoast SEO metabox, and you will find the content analysis below the focus keyword.

Yoast SEO showing readability score


Some of you may not be using Yoast SEO, or may want to see multiple readability scores. Here is how you can add separate readability analysis section for your posts.

First thing you need to do is install and activate the FD Word Statistics plugin. The plugin works out of the box, and there are no settings for you to configure.

Simply create a new post or edit an existing one. You will find a writing analysis metabox below the post editor.

Readability analysis showing Fog, Kincaid, and Flesch reading scores


This writing analysis metabox will show the readability score of your content using Fog, Kincaid, and Flesch readability tests.


Understand Readability Analysis Scores


Readability tests typically consider the number of sentences per paragraph, number of words used in a paragraph, and total syllables.

The Fog and Kincaid reading scores show the years of education required to read the passage as their score. This means that the higher the score, the more difficult your content is to read.

Flesch reading analysis scores based on ease of read between 0-100 where 0 is the most difficult to read.


Tips on Improving Your Site’s Readability


The readability analysis tools are a great way to improve your content. However, there is a lot more you can do to further improve your site’s readability.

First thing you need to understand is that users don’t always read the entire article. They scan the information to find the interesting bits.

Keeping your sentences short, and using fewer sentences per paragraph makes your content easy to scan. See how to add single/double line spacing in WordPress.

You should consider replacing difficult words with more commonly used and easy to understand words. Difficult vocabulary makes it harder to scan your pages.

Typography plays a very important role in improving the readability. If your text is too small and difficult to read, then this will obviously affect user experience on your site. Even if your content is well written, it will be hard to read.

If you are using Google Fonts on your website, then stick with one or two fonts throughout your page.

Make sure there is plenty of white space on your pages. If your content blocks are too close to each other, then try adding padding between them. You can do that by using CSS in your theme’s stylesheet. If you don’t know CSS, then you can use the CSS Hero plugin.

We hope this article helped you add and improve readability score for your WordPress posts

How to Upload Photos from Adobe Lightroom to WordPress

How to Upload Photos from Adobe Lightroom to WordPress


Many photographers use Adobe Lightroom to edit photos before uploading them to WordPress. While editing photos is essential, manually uploading them to WordPress can be a time drain. In this article, we will show you how to easily upload photos from Adobe Lightroom to WordPress with just one click.


Requirements for Adobe Lightroom to WordPress Uploads


First you will need Adobe Lightroom installed in your computer. Any version after Lightroom 5 or Creative Suite would work.

Secondly, we will be using Envira Gallery, which is the best gallery plugin for WordPress. It allows you to create beautiful responsive image galleries in WordPress.

Envira Gallery recently announced the Lightroom Addon which is available with their Gold and Platinum license. This addon provides seamless integration between Adobe Lightroom and your WordPress site.

Let’s take a look at how you can integrate Adobe Lightroom to WordPress.


Step 1. Setting Up Adobe Lightroom


First you will need to install and setup Adobe Creative Cloud app on your computer. Upon installation, creative cloud app will ask you to sign in with your Adobe ID. Once logged in, you need to make sure that file syncing is enabled.

Enable file syncing in Adobe creative cloud app


Next, you need to install the Envira Gallery addon for Adobe Lightroom. You can do this by visiting Addons for Adobe Lightroom page and searching for Envira Gallery.

Click on Envira Gallery to open the addon overview page, and then click on the Install/Free button to continue.

Installing Envira Gallery addon for Adobe Lightroom


After the installation, Adobe Creative Cloud app on your computer will show you a notification that Envira Gallery addon has been successfully installed.

The installation will also download envira-gallery.zip file to your computer. You need to go to your computer’s Downloads folder to locate the file and extract it.

In your computer’s downloads folder, you should now see a file enviralrplugin.zip. You need to extract this file because it contains a file named envira.lrplugin.

Next, you need to open Adobe Lightroom and click on File » Plugin Manager in the toolbar.

Plugin manager menu in Adobe Lightroom


This will bring up the plugin manager window. Go ahead and click on the Add button and select the envira.lrplugin file from your computer.

Add Envira Gallery plugin in Adobe Lightroom


Click ‘Done’ to close the plugin manager window. You should now see Envira Gallery in Adobe Lightroom under Publish Services.

You have successfully added Envira Gallery as a publish service to Adobe Lightroom. Now we need to setup Envira Gallery to work with Lightroom.


Step 2: Setting up Envira Gallery plugin


Envira Gallery is a premium WordPress plugin. Envira’s Adobe Lightroom addon comes with their Gold and Platinum plans.

First thing you will need to do is install and activate the Envira Gallery plugin. For more details, see our step by step guide on how to install a WordPress plugin.

Upon activation, you need to go to Envira Gallery » Settings page. You will need to provide your license key which can be found in your accounts page on Envira Gallery website.

Envira Gallery settings page


After verifying your license key, you need to click on the Addons tab and scroll down to locate the Lightroom Addon. Go ahead and click on the Install Addon button.

Envira Gallery will install the Lightroom addon, and then you need to click on the activate button to enable it.

Installing lightroom addon in Envira Gallery plugin


You will need to reload the settings page, and you will now see a new tab labeled Lightroom. Clicking on the Lightroom tab will show you two options.

Lightroom settings in Envira Gallery plugin


First, you need to choose the user account you want to use for publishing images from Lightroom. Second, you need to generate an access token. Copy this access token as you will need it in the next step.

Don’t forget to click on the Save button to store your settings.


Step 3: Connect Lightroom to Envira Gallery on Your WordPress Site


Now that we have setup both Envira Gallery and Lightroom, the next step is to allow Lightroom to speak with Envira Gallery on your WordPress site.

Open Adobe Lightroom and click on the ‘Setup’ link next to Envira Gallery under publish services panel.

Setup Envira Gallery as publish service


This will bring up the publishing services manager window. You will need to provide the address of your WordPress website and the access token you generated earlier.

Connecting Lightroom to Envira Gallery plugin on your WordPress site


Once you do that, click on the authenticate button. Lightroom will now connect to your WordPress site, and you will see a success message when it has connected to your website successfully.

Successful authentication


Click OK button on the success message and then click on the Save button in publishing services manager window


Step 4: Uploading Photos From Lightroom to WordPress


All the steps mentioned above were just for setting up Lightroom and Envira Gallery. You will not need to repeat those steps in the future.

Now you can easily upload photos from Adobe Lightroom to WordPress with Envira Gallery.

Start by going into Adobe Lightroom and then right clicking on Envira under the Publish Services panel. After that click on the ‘Create Published Collection…’ option from the menu.

Create new collection


This will bring up a popup window where you need to provide a name for your collection. It is important to note that this name will also become the name of your image gallery in your WordPress site.
Collection name


Once you have chosen the name, click on the create button to continue. Lightroom will now create an empty collection for you. You can drag and drop images from your library into your new collection.

As soon as you add, remove, or edit images in a collection, you will see a Publish button appear below it. Clicking on publish button will upload your photos to WordPress and store them in your Envira Gallery.

Publish from Lightroom to Envira Gallery


You can continue editing your images in Lightroom, make changes, add or remove images, and do anything you want. You can always click on the publish button and your Envira Gallery will get updated because this addon keeps Lightroom synchronized with WordPress.

You can visit your WordPress admin area and go to Envira Gallery to see your Lightroom collection added as a gallery.

New gallery created from Lightroom


This gallery will still be stored as a draft. In order to add it into your posts or pages, you will need to publish it.
Publish Envira Gallery to add it into posts or pages


That’s all. We hope this article helped you learn how to upload photos from Adobe Lightroom to WordPress.

How to Connect Google Drive to your WordPress Media Library

How to Connect Google Drive to your WordPress Media Library


Google Drive offers 15 GB of free cloud storage to all Google account users. With newer Android phones people can auto upload photos to their Google Drive account. Recently one of our users asked us if if it was possible to connect Google Drive with WordPress. Well ofcourse it is, there’s a plugin for that. In this article, we will show you how to connect Google Drive to your WordPress media library.


First you need to create a publicly accessible folder in your Google Drive. Log in to your Google Drive account and create a new folder. Click on the share icon and on the share popup screen click on the Change link next to Private – Only you can access.


Change access from Private to Public

On the next popup, you need to select Public on the web option and click the save button.

Paste folder ID to connect Google Drive folder to WordPress


Your Google Drive folder is now publicly viewable. You need to copy the folder ID from the link to share, you will need this ID later.

Copying the folder ID from the link to share on Google Drive

In the next step, you need to install and activate the Google Drive Media Library plugin. Upon activation, visit Media » Google Drive Media Library to configure the plugin.

 On the plugin’s settings page, you need to click on the Mapping Folder tab and paste the folder ID you copied earlier. Click the save button and the plugin will attempt to locate your Google Drive folder.

Paste folder ID to connect Google Drive folder to WordPress


Now you can upload files in your shared folder. To load those files into WordPress media library, you need to come back to Media » Google Drive Media Library and click on File Mapping tab. Enter the name of the file you want to map.

Adding a file from Google Drive to WordPress media library

After you have saved the file, the plugin will start displaying them in your WordPress media library. You can edit the media, and insert it into your WordPress posts and pages. The file will still be served from Google’s content delivery network.

A file from Google Drive displayed in WordPress media library

We hope this article helped you connect Google Drive to your WordPress media library.

You can Download Free Premium Plugins

How to Add a Forum in WordPress with bbPress


Add a Forum in WordPress with bbPress


Bulletin boards and forums are good old reliable tools to build online communities. There are plenty of open source forum softwares that you can install on your website. However, if you are running a WordPress site then integrating a third party forum with WordPress can be a mess. bbPress is the answer to that problem. In this article, we will show you how to add a forum in WordPress with bbPress.


What is bbPress?

bbPress is a forum software built the WordPress way. It uses your existing WordPress core which makes it really easy to add a forum in WordPress with bbPress. It is extensible, so you can add additional add-on plugins to extend the functionality. bbPress is light-weight and faster than other popular open source forum softwares.


How to install bbPress

bbPress is available as a WordPress plugin. You can install it like you would install any other WordPress plugin. Simply log in to your WordPress admin area and go to Plugins » Add New . Search for bbPress and then select bbPress from results. Install and activate the plugin. Upon activation you will see the welcome screen for bbPress.

bbPress welcome page


Creating a Forum with bbPress in WordPress

Once installed, bbPress adds Forums, Topics and Replies menu items in your WordPress admin.

Click on Forum » New Forum. This will take you to a screen similar to WordPress post edit area. Provide a title for your forum and enter a little description of it. Then press the publish button.


Creating a new forum in bbpress


Displaying bbPress Forum in the Front End of WordPress

Now that you have created a few forums, it is time to display those forums on the front end of your WordPress website. Create a new WordPress page. Give this page a title, like Forum,
Community, Support Forums, etc. Paste the following shortcode in your page:

[bbp-forum-index]


Turn off comments and trackbacks on this page and then publish it.

Go to Appearance » Menus and add this page to your navigation menu.

Now when a user clicks on this page, it will show your main forum index.


Forum Index page in bbpress displayed in Twenty Twelve WordPress theme

Integrating bbPress with your WordPress Theme

In most cases, you would probably want to open your forum for new registrations. To do that you need to open your website for registrations.
Go to Settings » General, check the box next to “Any one can register” to allow registrations on your website.

Opening your bbpress forum for registrations


Now that your website is open for registration, the first thing that your forum participants would look for is a registration page. To create this simply create a WordPress page, and give it a title, e.g. Register. Add shortcode [bbp-register] and publish the page.
Another page your users would need is the lost password recovery page. Create another WordPress page, give it a title e.g. Lost Password. Add this shortcode to the page [bbp-lost-pass] and publish the page.

bbPress comes with a handful of widgets. Go to Appearance » Widgets to check those widgets. The most important widget that you would need is the (bbPress) Login Widget. Drag and drop Login Widget to your sidebar or any other widget area. Enter the URI(s) for the registration and lost password pages and save the widget.

bbPress log in widget settings


Now a login form with links to registration and lost password recovery pages will appear in your sidebar. Logged in users would see their usernames and a log out link instead of the form.


bbPress login form in sidebar


Managing bbPress Forum Settings

Unlike other popular forum software, bbPress has a very simplified configuration page. To manage settings for your bbPress forums, go to Settings » Forums. This is the bbPress settings page from where you can control several aspects of your forum.

bbPress forums settings page


The first option you would see on Forums Settings page is “Disallow editing after”. Default option for this setting is 5 minutes. This setting allows Forum participants to edit their posts after publishing. After this time they will no longer be able to edit their posts. However, a forum Keymaster or Moderator can over ride this setting.


The second option “Throttle posting every” 10 seconds is basically a forum flood protection measure. It allows you to control after how much time a new post should appear on the forum.
On the settings page you can configure forum and topic slug as well as the number of topics and posts to appear per page. You can also allow users to subscribe to topics or add topics as favorites.

User Roles in bbPress

bbPress comes with five pre-defined roles, each with different capabilities.

1. Keymaster – The website owner or the WordPress administrator is automatically assigned the Keymaster role when they install bbPress. A Keymaster can delete and create forums, can create, edit, delete all posts, topics, forums.


2. Moderators – Users with moderator user role have access to moderation tools, which they can use to moderate forums, topics, and posts.


3. Participants – This is the default user role, participants can create and edit their own topics and posts, they can favorite and subscribe to topics.


4. Spectators – Spectators have a read only access to public forums, topics and posts.


5. Blocked – When a user is blocked all their capabilities are blocked. They can still read publicly viewable topics and posts, but can not participate in the forums.


That is just how easy it is to create a forum in WordPress with bbPress. Ofcourse you can add other functionality by using over 100+ different bbPress plugins.


We hope that this article helped you learn how to add a forum in WordPress and how to install and configure bbPress. If you have any questions, best practice tips for working with bbPress or any other feedback, then please leave a comment below.

Difference Between Wordpress.com and Wordpress.org

Wordpress.com vs Wordpress.org


 if you're new to Wordpress,  you might be wondering about the defference between Wordpress.com and Wordpress.org.


Difference Between Wordpress.com and Wordpress.org


What's the Difference Between Wordpress.com and Wordpress.org

Simply ! its all about hosting

The one major difference between WordPress.com and WordPress.org is who’s actually hosting your website.

WordPress.com, on the other hand, takes care of all of the hosting for you. You don’t have to download software, pay for hosting, or manage a web server.

With WordPress.org, You host your own blog or website. WordPress.org is where you’ll find the free WordPress software that you can download and install on your own web server. 


Pros and Cons of WordPress.com vs WordPress.org


Both WordPress.org and WordPress.com have pros and cons, depending on your needs.

If you’re not interested in paying for your own hosting, managing your own web server or paying someone else to handle that for you, you’ll probably want to use WordPress.com. It’s free and easy to set up and you have lots of options for customizing your site.

A few of the cons of using WordPress.com include that your domain will, by default, include “WordPress.com.” You also can’t upload any custom themes, plugins or modify the PHP code behind your site.

While WordPress.com is free to set up, they do offer several premium upgrades, including domain name registration (if you don’t want WordPress.com in your domain name), the ability to upload videos and if you want to use their premium themes.

Using the downloaded version of WordPress from WordPress.org opens up more control and flexibility for your WordPress site, but it also means more responsibility. Using a self-hosted version of WordPress means you can use your own domain name, upload and install themes and plugins, edit the code behind your site and have access to your site’s database (or files). Most of the showcase sites you see on the WordPress site showcase are the self-hosted version of WordPress, since many of them have unique functionality or a custom-made design.


Advantages of Wordpress.com

  • No Hosting costs
  • No managing a web server
  • Easy to set up
  • Customization options

Disadvantages of Wordpress.com

  • URL will be Yoursite.wordpress.com
  • No uploading custom themes, plugins
  • No access to your site's code

Advantages of Wordpress.org ( The Self-Hosted Software )

  • Use your own  domain name
  • Upload and install themes and plugins
  • Edit code behind your site
  • Access your site's database (or files)

-->