Showing posts with label Tips and Tricks. Show all posts
5 Tools to Create Better Images for Your Blog Posts

5 Tools to Create Better Images for Your Blog Posts


Do you want to create better images for your blog posts? Images create a huge impact on how users engage with your content. However, most users are not designers and are unable to create professional looking images for their blogs. In this article, we will show you some of the best tools to create better images for your blog posts.

1 Visage


Visage is one of the easiest and most powerful tools to manage visuals for your blog. It allows you to create and design professional looking graphics for your blog posts, Facebook pages, Twitter, LinkedIn, etc.
It comes with tons of professionally designed templates to start with.
You can also save your brand’s logo and other assets and use them into your visuals. You can save, export, and share your graphics. Visage is great for individuals and teams.


2 Canva


canva

Canva is another popular choice among bloggers. It allows you to create all kind of graphics with easy to use drag and drop tools.
It comes with professional looking templates that you can use as a starting point. You can also purchase stock images, icons, and other resources directly from the app.

3. Pablo by Buffer

Pablo by Buffer is a simple image editor. It comes with a beautiful interface that allows you to search for free stock images, choose a template, and then add your own text and icons to it.

4. Piktochart

Piktochart is an easy to use infographic maker for everyone. It comes with tons of professionally designed templates for infographics, presentations, posters, and reports.
You can add your own charts and graphs, maps, icons, photos, and even videos. There are plenty of free images, icons, illustrations that you can use into your project.

5. Ribbet

Add cool CSS3 animations to your content

Make website content more awesome by using free plugin 'Animate it!'  By eLEOPARD Design Studios

Animate it!

Add cool CSS3 animations to your content.


This Free Plugin allow to apply CSS3 animation on Post,Widget and Pages, 50+ Entry,Exit and Attention Seeker Animations, Capability to apply animation on Scroll also add different scroll offset on individual animation blocks, by using this plugin you can apply animtion on Click,Hovar etc in simple you can mak your website content more awesome.
    Some of the Key features Include:
  • Providing a button in the editor to easily add an animation block in the article or post.
  • Allow user to add animation on WordPress widgets. Use Class Generator to generate the required animation classes.
  • Allow user to apply animation infinitely or any fixed number of times.
All the CSS3 animations are from Animate.css and Animo.js


Download


How to Add Quotes & Tips block into WP site

If you want add Quotes or Tips block into your wordpress website, then we have awesome free plugin for this, i know its easy to add block of Qoutes or Tips into your wp site but This plugin allows you to create and publish quotes of your customers about your work and helpful tips for the website visitors. Imagine that now on now your satisfied customers will help to promote business. Moreover, it is very simple in using.

Quotes and Tips by BestWebSoft


Features
  • Set a background image for the block, change background color and text color.
  • Add quotes & tips to any place on your website.
  • Change a label for the Quotes block and Tips block - user custom label or title of the quotes & tips posts.

Downlaod

Custom Login URL


Customize Your WP login Urls

example.com/wp-admin Change into example.com/login
Customize it with Free Custom Login URL  (CLU), This Free Plugin allows to customize default WP login, registration and password reminder URLs without modifying any files, simple

Custom Login URL


Upload
  1. Upload custom-login-url folder to the /wp-content/plugins/ directory
  2. Activate the plugin through the 'Plugins' menu in WordPress
  3. Go to wp-admin / Settings / Permalinks and configure your custom URLs

Download

Auto Terms of Service and Privacy Policy

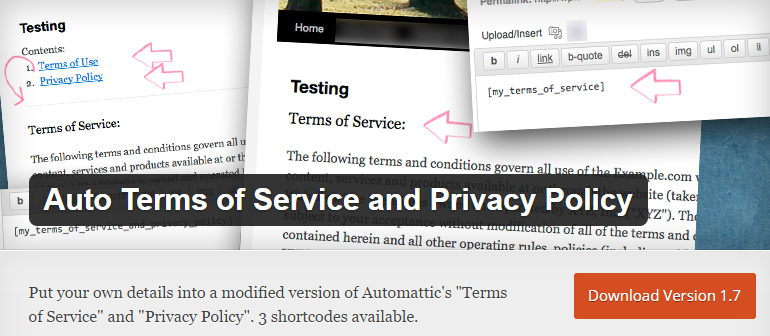
Generate a terms of service and privacy policy content and displays

Auto Terms of Service and Privacy Policy


Just as the name suggests, this plugin will automatically generate a terms of service and privacy policy content and displays them effortlessly with shortcodes. While it’s not a substitute for professional legal services, it’s still a plugin worth considering in the interim or if you’re strapped for cash. It borrows the page content from WordPress’ own legal pages to help you generate one with your business name and information. They’re both available under a Creative Commons license so it’s available for you to use for free.


Downlaod

Safely Move Wordpress Site (2 Best Free Plugins)


There are lots of free and premium Plugin for moving WordPress site from one server to another, but here is two free plugin which safely move WordPress site without pain.


WordPress Duplicator

WordPress Duplicator, site move plugin


The Best plugin in the WP Plugin Repository is WordPress Duplicator , peoples like a lot this free plugins, which ables to clone, duplicate,backup, transfer and move an entire website from one server to another.
This free plugin downloaded more then 480,000 times, and its average rating of this plugin 4,9 stars on WordPress Plugin Repository,
The Developer of WordPress Duplicator is 'Developers for Developers'

 Download


WordPress Move

Wordpress move

Second One is WordPress Move, if you want to change the domain and migrate your installation to another server WordPress Move is best  for it, This Plugin also allows to transfer database and create backups of installation.
This Plugin isn't popular as WP Duplicator, it downloaded more then 80,000 times, but  it is easy to use  and migrating a wp site is quick without any harmless

Download


Declaimer : Don't forget to backup files before using any plugin

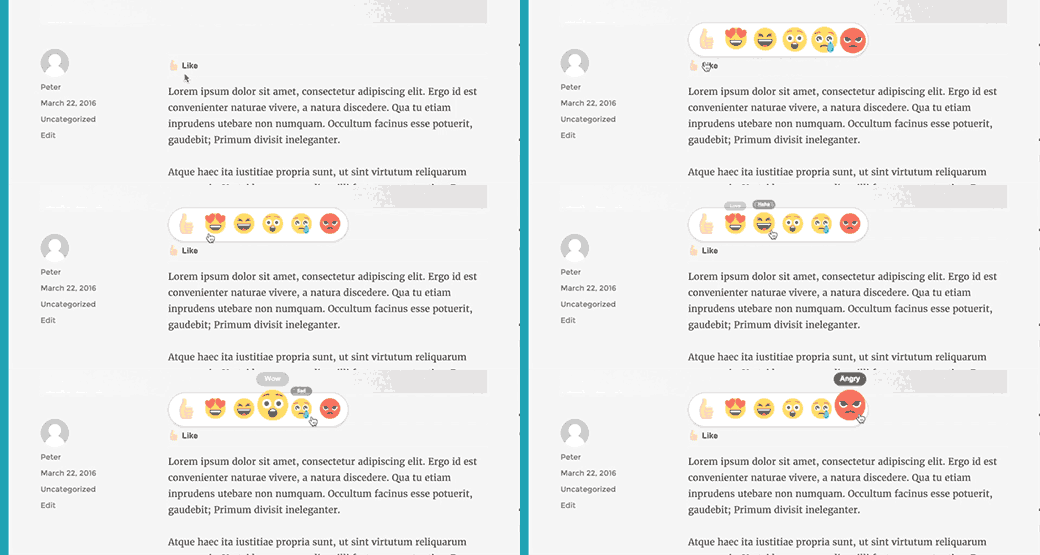
Like Reactions of Facebook Add to Your WordPress Posts


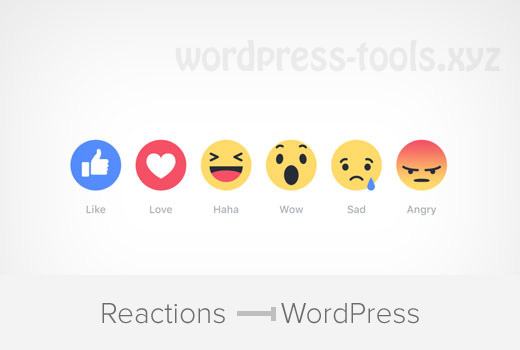
Do you know that you can add Facebook like reactions to your WordPress blog posts? As you know that Emotional reactions allow users a way to provide quick feedback on your articles. In this article, we will show you how to add Facebook like reactions to your WordPress posts.

Like Reactions of Facebook  Add  to Your WordPress Posts


What is Reactions?


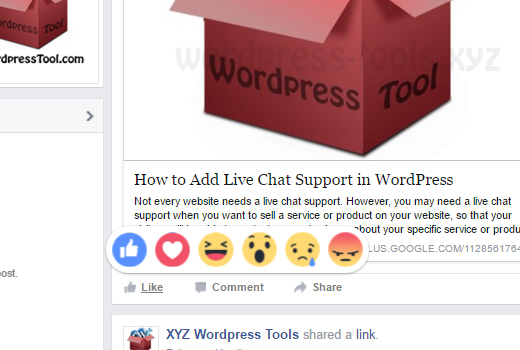
Facebook recently added more ways for users to show their reaction on posts in their timelines. Aside from just clicking like on the post, they can also show other expressions.

Facebook Like Reactions into Your WordPress Posts


However this Facebook feature is not yet available for WordPress sites,You can use the old Facebook like button.

Since Facebook’s implementation is the fastest and more visually appealing, we found a WordPress plugin that allows you to add facebook like reactions to your WordPress posts..

Let’s see how you can add the functionality similar to Facebook reactions in your WordPress blog posts.

Setting up FB Emotional Reactions in WordPress


First thing you need to do is install and activate the DW Reactions plugin.

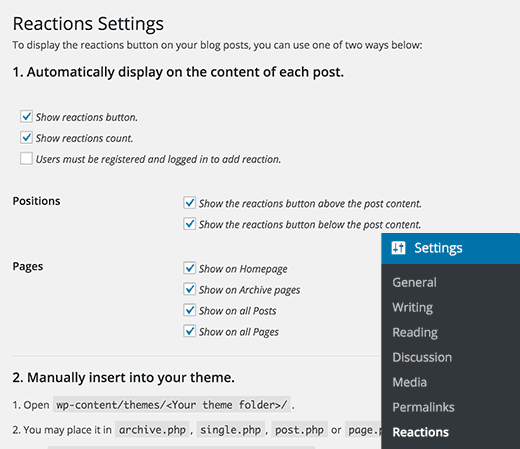
Upon activation, you need to visit Settings » Reactions page to configure the plugin settings.

Reactions Settings


For automatic display of reactions in your blog posts, check the boxes next to Show reactions button and Show reactions count options.

By default, the plugin allows registered and logged in users to react. You can change that by unchecking the box next to ‘Users must be registered and logged in to add reaction’ option.

After that click on the Save changes button to store your plugin settings.

You can now visit your website to see the plugin in action.

facebook reaction preview


If you only want to show reactions on selected posts and pages, then you need to disable automatic display by unchecking the first two options in the plugin settings.

After that, you can use the [reactions] shortcode in your posts and pages where you want to display reactions.

That’s all, we hope this article helped you add Facebook like reactions to your WordPress blog posts.


Video


How to Add Live Chat Support in WordPress


Not every website needs a live chat support. However, you may need a live chat support when you want to sell a service or product on your website, so that your visitors will be able to contact you and ask you about your specific service or product.

Sometimes, a customer may need immediate assistance regarding your services or products. To make this happen, the only way to get in contact with the website team is live chat support. I have experience with website promotion and I found that having a live chat support on an online website increases the position in online market and boosts your products and services sales.

In this tutorial we are going to use Formilla Live Chat plugin. Due to its free features, we’ve chosen this plugin. You can, however, use any plugin of your liking.

Step 1: Plugin Installation

  • Log in to your “WordPress Admin Panel“.
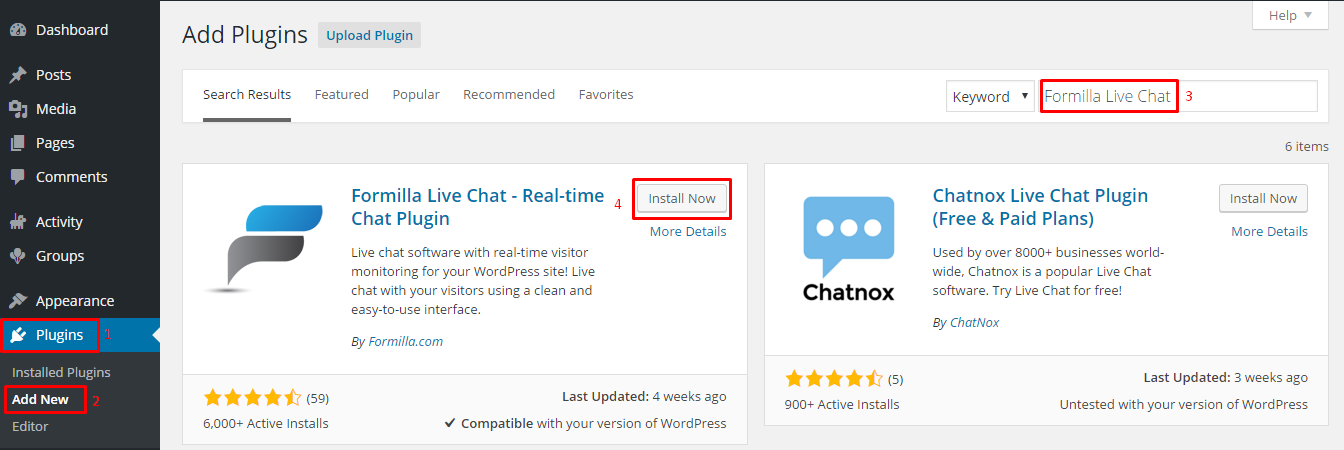
  • Navigate to “Plugins > Add New“.
  • From top right, search for “Formilla Live Chat”.
  • Click on “Install Now” as shown in image.
  • After installing, click on “Activate Plugin


Formilla Live Chat


We’ve downloaded and activated the plugin.
In order to proceed, we’ll have to create an “Account on Formilla“ website.
Within your WordPress Admin Panel.

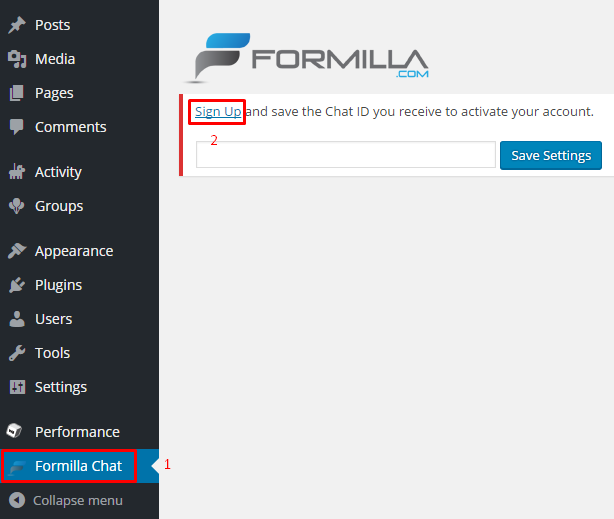
  • Navigate to “Formilla Chat“.
  • Click on “Sign Up“.

Formilla Sign Up

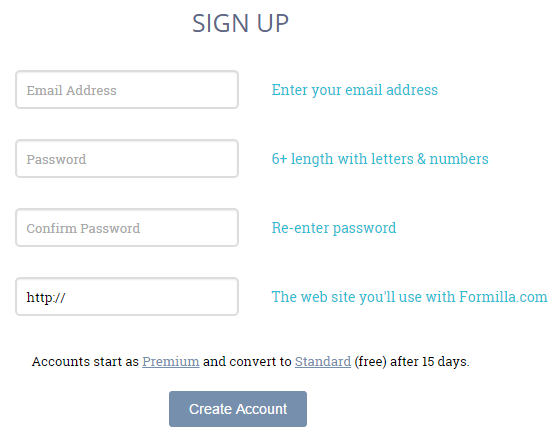
Formilla Sign Up form will be opened.

  • Enter your details.

Sign Up Formilla

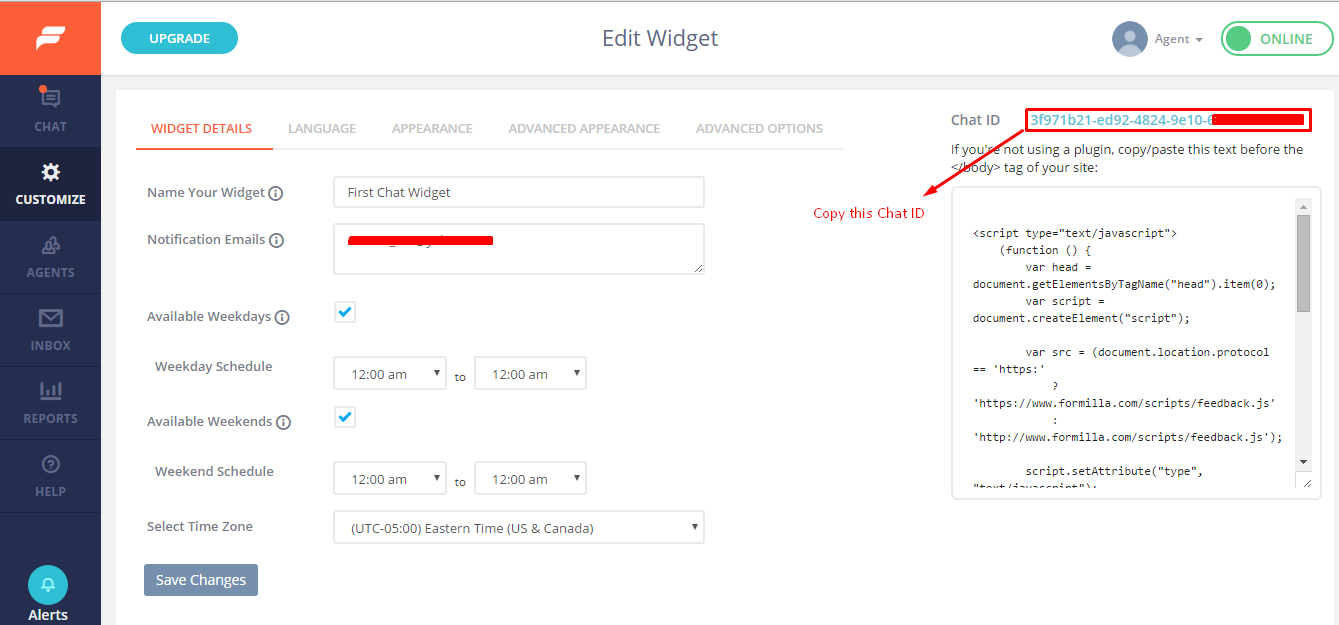
After creating your account, you’ll see something the following screen. You can edit your widget according to your needs.

  • From here, copy your “Chat ID“.

Formilla Chat ID

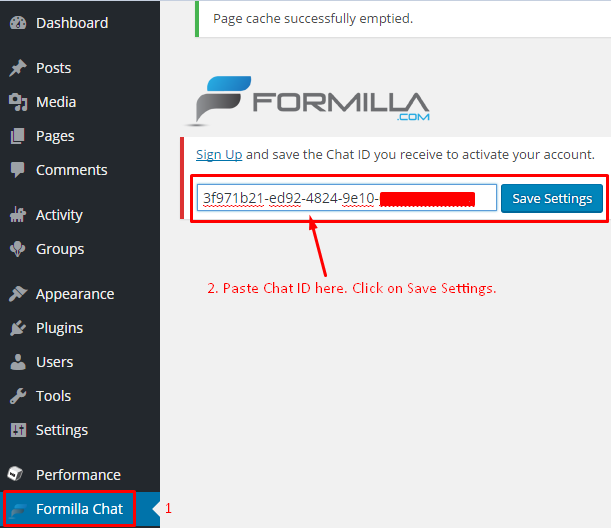
Go back to your “WordPress Admin Panel“.
Navigate to “Formilla Chat“.
Paste “Chat ID“ here.
Click on “Save Settings“.

Formilla Chat ID

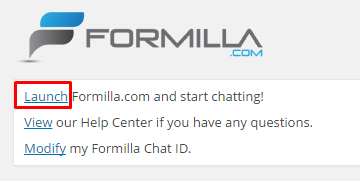
After Saving Settings, You’ll see the below screen.

  • Click on “Launch“.


Formilla Launch

Ok, So now we’ve successfully integrated a “Live Support“ on our WordPress website.

Formilla Chat Panel


or testing purpose, open “Incognito window“ in Chrome. By hitting “Ctrl+Shift+N
Go to your website. You’ll see a “Chat Box“ at bottom right corner.
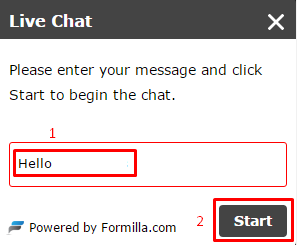
Enter your message and click on “Start” to begin the chat.

Live Chat


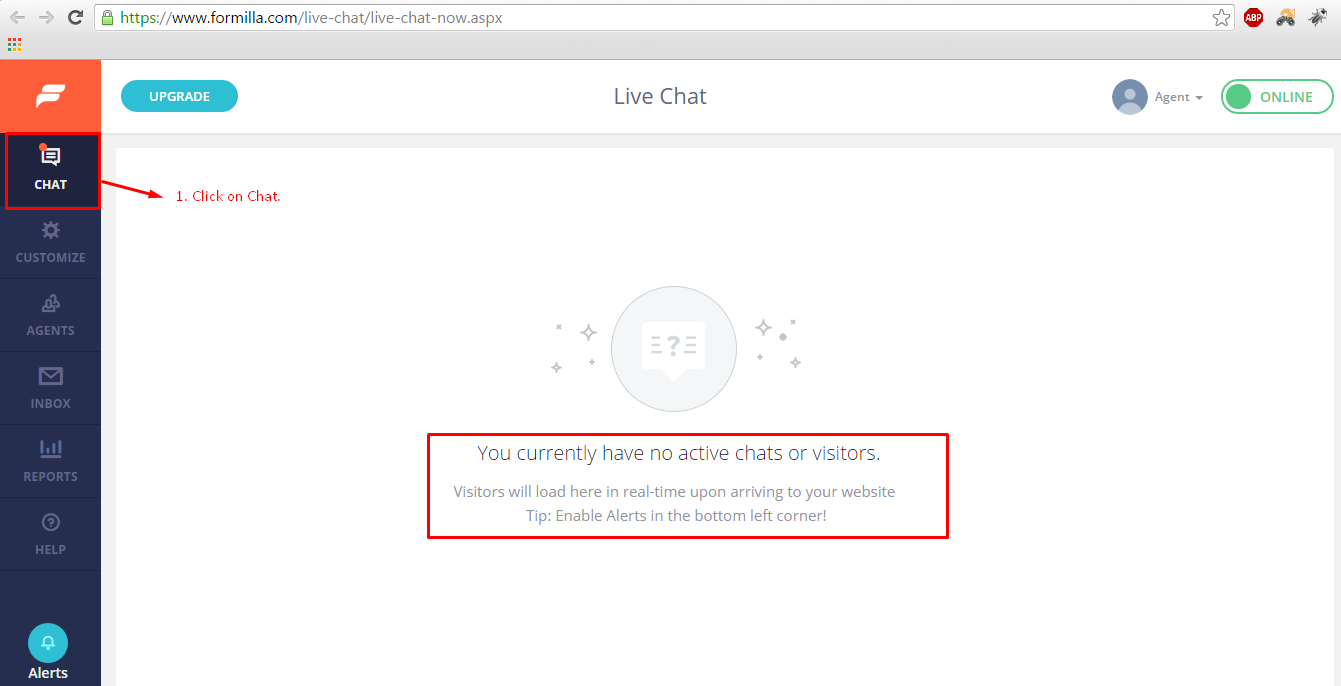
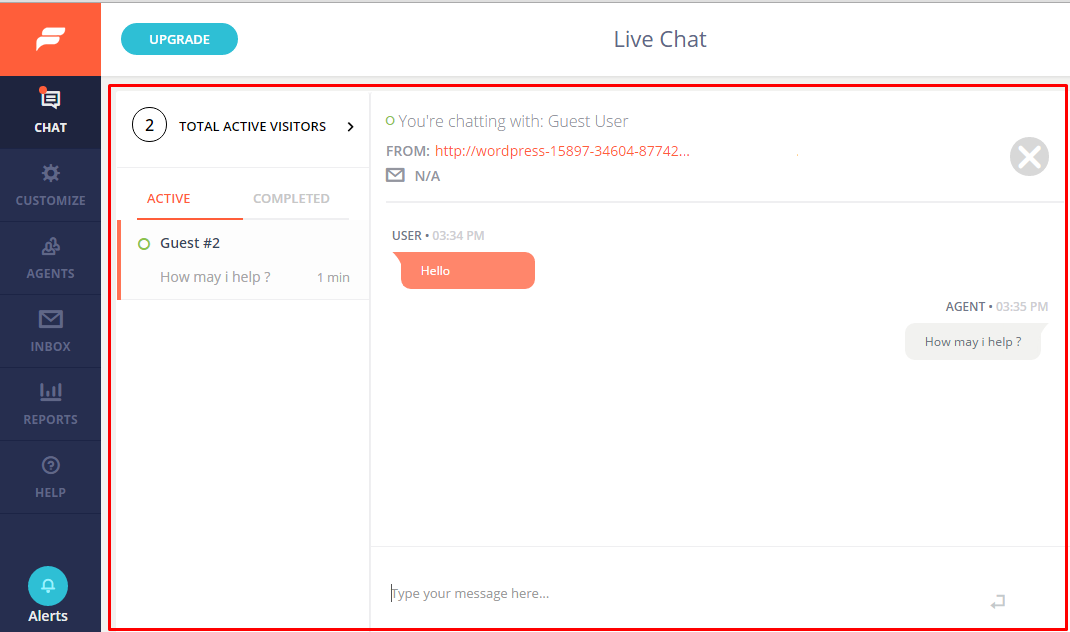
Go back to “Formilla“ website.
Click on “Chat“.
You’ll see “Chat box“ like this.

Formilla Live Chat


And we’re done setting up a live chat support on our WordPress site
 10 Useful Security Tips WP

10 Useful Security Tips WP


Ten quick tips for improving the security of your new WordPress website


WordPress security is an important aspect you’ll have to take into account for every action that affects your site, starting from the plugins you choose to install, the themes you’ll end up using and other aspects that don’t come to your mind as frequently as they should.

Security is a serious thing and an ongoing process that you should always keep under your radar. Think of the following security tips as layers you’re adding to your website, making it harder to be hacked and violated.


1- Never use “Admin” as your administrator username


“Admin” is the most common username for WordPress admin users. Everybody knows this, thus hackers. To make their life a little more complicated, you should prefer any other username over “admin” and pick one with capital letters. Since you already have a WordPress website, you should now:

  • create a new user with administration privileges
  • if your previous "admin" user was your only user, assign all blog posts and pages to the new admin user you just created
  • delete the old “admin” user from your WordPress


This will give hackers hard times when trying to log-in on your website, but, of course, it’s just one piece of the pie.


2- Pick strong passwords (long, with numbers, capital letters, and symbols)


The other being your password and its complexity. Do you know which passwords were the most common in 2014? You won’t believe it: “123456”, “password”, “12345678”, “qwerty” and “123456789” are the 5 most used passwords. This data have been collected and shared by security consultant Mark Burnett, who scout for and gathered 10 million passwords from the Web over a period of several years.

Long story short: passwords are vital to your WordPress security. That’s why you need to start using passwords that have the following features:

  • have no words in it to prevent dictionary attack
  • have symbols and numbers in it
  • be at least 15 characters long


If you don’t know how to come up with a password so strong, just use a service like strongpasswordgenerator.com or try a phonetic password generator, which will do the work for you. And if you want to take your users and passwords management to a new level, use services like LastPass, which will be able to generate strong and long passwords as well.


3- Use 2-factor authentication for login


Two-factor authentication is a combined way to provide login credentials to a service, oftenly in the form of something you know and something you have, like a disposable string of numbers. Apple iCloud, Google, Dropbox, and many other services provide you with the possibility to use this more secure way to log in, so why wouldn’t you with your WordPress website?

To efficiently implement a two-factor auth, you should use one of the many plugins available . Two interesting plugins that give a “twist” to two-factor auth are Rublon, which is also an email-based two-factor authentication, and Clef, which uses the camera of your phone.


4- Disable login hints


Any time you type wrong, non-existent username or just an incorrect password on your WordPress website’s login form, you’ll get a hint telling you either your username is wrong, or your password doesn’t match with that username.

Maybe it never occurred to you but this is golden for those hackers looking to break into your website. That’s why you should get rid of such information by disabling it with a script within your functions.php file:

function no_wordpress_errors(){
  return 'What the heck are you doing?! Back off!';
}
add_filter( 'login_errors', 'no_wordpress_errors' );

Change the “What the heck are you doing?! Back off!” message to better fit your mood.


5- Download plugins only from known resources


Plugins are one of the most powerful elements in the whole WordPress ecosystem, and as of today there are 40k+ of them in the WordPress repository. But plugins can be found in many other places and marketplace like Code Canyon, Mojo Code, etc., GitHub and The Unofficial WordPress Plugin Directory (WPD).

Before downloading any plugin from anywhere, you should always look for:

  • reviews, comments or any other opinions related to the plugin and the plugin’s author
  • if support is provided and in which form (free vs. paid)
  • if plugin’s author is responsive to users
Never forget: before downloading a plugin, do a full back of your website and database.


6- Keep your WordPress environment updated


Each time a security issue pops up, a patch is on its way, meaning that keeping a website up and running securely is a continuous commitment. Having all your files updated to their latest available version is an excellent way to increase the security of your WordPress website.

From WordPress 3.7+, minor and security updates happen automagically in your WordPress installation, while to perform major updates to WordPress core files, plugins and themes you’ll need to either perform them via your dashboard or FTP.

When talking about keeping all your files updated, there's more than just security enhancements like improved performances, bug fixes, better compatibility and new features.


7- Keep your WordPress clean


In an updated WordPress environment, there won’t be any room for “unused” stuff such as deactivated plugins and old themes, which might bring in some security issues since you haven’t been using them recently and probably forget to update.


8- Set file and folder permissions to correct values


File and folder permissions are set of rules that “specify who and what can read, write, modify and access them” in your WordPress website. These permissions are provided with a three-number value to any files and folders.

Since these values can regulate which users can modify (or even delete) files and folders, you’d need to set them up with the following values:

  • folders = 755
  • files = 644
Also be warned never to use a permission mode of 777 for any of your files or folders because it would enable any users full privileges among your files and folders. For more information about permissions mode, please refer to this page.


9- Prevent directory browsing (indexing) of your WordPress website


When your web server doesn’t find an index.php or index.html file, it’ll display a page showing the contents of such directory, making important information related to your installed plugins, themes, and so on, easily available to anybody

You can check to see if directory browsing is enabled on your site by creating a new folder containing a simple text file and then visit the directory via your web browser. If it displays a link to the text file, then directory browsing is enabled. If you get a message like “Page Not Found”, “Forbidden” or just a blank page, then directory browsing is disabled.

Since the goal here is to make your WordPress website more secure with quick tweaks, it’s helpful to prevent that information from not being quickly known by hackers. To do so, you should add to your .htaccess file this line:
Options All -Indexes


Make sure that both your wp-content/themes and wp-content/plugins folders have a blank index.php file in it too.


Your turn now


Keeping your website secure will be one of the most important elements on your to-do list since it’s an ongoing and neverending process. These quick and useful tips are the very beginning for any new WordPress sites and, of course, there are many (and more robust) ways you could significantly improve the security.

That’s why I’d like to ask you: which tactics, plugins, and tips do you think are great to enhance the security of a WordPress website?

Show Category Icons

How to Show Category Icons

How to Show Category Icons Wordpress


Pictures make a site more lively which is a given which is why blogger might want to associate pictures with their category. This plugin lets you associate a specific icon of your choice to a designated category. You can use this plugin to list categories by icon with or without names, and much more.

Download Free Category Icon Plugin

Download Plugin

The No. 1 plugin to assign icons to categories. Category Icons allows you to associate a unique image with each of your WordPress categories.

How set an Expiration Date for Your Posts

Set an Expiration Date for Your Posts

 How set an Expiration Date for Your Posts


This is very useful when you are running a contest because you might be posting information such as clues or hints that you don’t want to stay up for ever. Instead of manually removing the article, you can just make it expire automatically. It also works if you have a product that you are offering a discount on. You posted it on your blog, but you don’t want that discount to stay on your blog after its over. So you can remove it automatically with this code.

All you need to do is replace your WordPress Loop with this code:

    <?php
    if (have_posts()) :
    while (have_posts()) : the_post(); ?>
    $expirationtime = get_post_custom_values('expiration');
    if (is_array($expirationtime)) {
    $expirestring = implode($expirationtime);
    }

    $secondsbetween = strtotime($expirestring)-time();
    if ( $secondsbetween > 0 ) {
    // For example…
    the_title();
    the_excerpt();
    }
    endwhile;
    endif;
    ?> 


Once you have done that, you can use custom fields when writing a post to set an expiration date. Make sure you select the key “expiration” and use the the following date format: mm/dd/yyyy 00:00:00

Now this hack does not remove or unpublish the article instead it just excludes the article from being displayed in the loop

Wordpress Smart Automation for Social Sharing

How to Automating Your Social Media Accounts For Your WordPress Site – All in One Go! With If This Then That


In all most all cases, social media marketers and every other pro out there tries to find ways to automate repetitive tasks. It saves a huge amount of time! And Time is Money – Spend your time on something that makes you more productive.


The automation options are categorized into 2 groups:

  1. Automation tools that cover a whole range of social media channels

  2. Tools which cover a limited number of channels – 5 to 10, or even one, as in the case of channel specific plugins.


Social Automation Tools – Multiple Channel Options


If you want to automate all of your social media accounts, an all encompassing tools might be best for you. Here are a few different options to consider for your WordPress site.

If This Then That


The first one that comes to mind is not a plugin but a service called IFTTT, which expands to If This Then That. With this service, you can create a set of triggers which, when set off, can initiate a set of responses.

If This Then That WP
Login to the website and create an account. To understand how this works, check out the screenshot below.

if and then toturials


As an example, you can pick WordPress under ‘This’ as below

connect with wordpress


After you have filled in your site details, you can pick the social media channel that you want to post to under ‘That’. Some of the Social media channels that are covered are,

ifttt social


Once this is done, you have established the channels you want your content to be automatically posted to. For this service to work, you must also configure your WordPress site to post automatically. This is quite simple – head to General Settings > Writing and enable XML-RPC. For versions of WordPress 3.5 and higher, this functionality is automatically enabled.

And remember, this service can be made to work in reverse as well, by switching the ‘This’ and ‘That’ options. By reversing, you can use this feature to gather all the social media blips about yourself and archive it in one place.

Download

15 Reasons Why You Should Use WordPress

15 Reasons Why You Should Use WordPress

15 Reasons Why You Should Use WordPress

The benefits of using WordPress on your website are almost too many to count. Right off the bat, if you have an idea for a website but have virtually no idea how to get that website up and fully operational, WordPress is your answer. Originally launched in 2003, WordPress has become perhaps the most popular content management system (CMS) in the world. It’s quick to set up, easy to use and most importantly, it’s free.

In a nutshell, WordPress is an open source blogging platform that you can use for a personal or business website. It is completely user-friendly and has tons of support. You don’t need to know technical jargon or spend hours tinkering with code to make your website do all kinds of cool things. While there are countless reasons why using WordPress is a smart move, here is my list of the top 10 reasons why you should use WordPress on your website.


1- It’s Free and Easy


Whether you’re a blogger or just launching a new online business, the fact that WordPress is 100 percent free is extremely beneficial. Best of all, you never have to worry about hidden charges if your site becomes more popular than expected. WordPress will always be free for you to use.

If you’re reading this article you already have everything you need to get started. Head over to WordPress.com and signup for a free account. You’ll have your website up and running in about two minutes. For a small additional fee you can even host your domain name there.

Most web hosting companies today allow their clients to install WordPress on their websites (it is called WordPress Hosting). With the click of a mouse, you can easily add pictures, articles and other content. The control room of a WordPress blog is called the “Dashboard.” It is easy to navigate and intuitive.


2- WordPress is good for both your blog and your website


It’s true that WordPress started out as a blogging system, but that was ages ago. Over the years WordPress has evolved into a full-featured web content management system. That means you can use WordPress to manage your whole website, not just your blog. Of course if you just want to blog, you can use WordPress that way too.


3- It is expandable and supported


Currently there are over 30,000 plugins available for WordPress. Chances are, if there’s an application you want your website to do, there’s a WordPress plugin for it. At the WordPress website alone there are almost 8,000 WordPress Plugins

WordPress can handle large amounts of web traffic and is able to ride out any traffic spike without a problem.


4 -Thousands of professionally designed themes — many of them available for free.


WordPress themes allow you to have a professionally designed website without the pain or expense of hiring a professional web designer.

There are over two thousand free themes available in the official WordPress Theme Directory and even more available for fee at commercial sites like Theme Forest, StudioPress, and WooThemes.


5- WordPress plugins add complex business features to your website without having to hire a coder.


Need some additional functionality on your website? There’s a plugin for that!

WordPress was designed to be extended and that’s exactly what programmers around the world have done. There are thousands of WordPress plugins available that add functionality to the core system. So whether you need a simple contact form or a full-featured ecommerce system, there’s a plugin to meet your business needs.


6- WordPress is search engine friendly and It’s automatic.


As Google Engineer Matt Cutts says, “WordPress automatically solves a ton of SEO issues.” And with the free Yoast SEO plugin, your site will be even more search engine friendly.

WordPress automatically posts and publishes. It uploads images, updates indexes and knows how to build SEO value.


7- WordPress is ready for the mobile web.


If you assume your customers are visiting your website from a full-sized computer, think again. Mobile website usage is exploding. If your website doesn’t look great and work well on a smartphone or tablet your customers will skip your site and go somewhere else.

Many WordPress themes are designed to be responsive (aka mobile-friendly), meaning your customers won’t be challenged to use your website on their smartphones. And the WordPress dashboard is designed to work on smartphones as well as full-sized PCs — so you can easily manage your website from anywhere.


8- Safe and Secure.


Since WordPress is such a popular CMS, it shouldn’t be surprising that it’s a target for hackers. However, WordPress takes the security of its users very seriously. While you can practice some basic security measures, such as not downloading a theme or plugin from an untrusted site, WordPress constantly updates its software to prevent attacks. In fact, WordPress has an automatic update feature ever since the release of version 3.7.


9- WordPress is open source.


Unlike other website building tools WordPress is open source and free from commercial restrictions and limitations. That means you can use the software anyway you choose and host your website anywhere you choose. All without fear that changes in someone else’s business model will have an adverse impact one of your most important business assets.


10- You’re not committed to one hosting provider


If you need to switch a provider or host, either because they can’t handle traffic or you’re just frustrated with them, you can do it without experiencing much downtown. This is because WordPress works with pretty much every server. If you need to make the switch, I recommend that you review the following article from wordpress-tools.xyz. There are several free WordPress hosting options as well.


11- Can be used as a membership service.


If you want to continue to grow a loyal fan base, and maybe even make some additional income, then you can convert WordPress into a full-fledged membership site. When you create an exclusive membership site you’re providing members exclusive content they will find useful. If you want to create a membership site you should look over this article (article available soon on our website)


12- Multi-user capability.


There’s a very good possibility that you’ll have to rely on multiple people to keep your site up and running. WordPress is aware of this and has made it easy for you to assign different roles for different individuals. Here is a summary of these roles from WordPress Codex:

  • Super Admin – somebody with access to the site network administration features and all other features. See the Create a Network article.
  • Administrator – somebody who has access to all the administration features within a single site.
  • Editor – somebody who can publish and manage posts including the posts of other users.
  • Author – somebody who can publish and manage their own posts.
  • Contributor – somebody who can write and manage their own posts but cannot publish them.
  • Subscriber – somebody who can only manage their profile.


13- Publish content with one-click.


Have you just written an article or blog post that you need to publish immediately? No problem. After creating your amazing content, you can publish it with just the click of one-button. Furthermore, there are even a number of mobile apps that allow you to publish your WordPress content no matter where you are.


14- Universal platform.


WordPress features a universal platform. The WordPress dashboard always looks the same - no matter what you’re using WordPress for. You don’t need to hire experts or spend an excessive amount of time trying to figure out how to use WordPress. In fact, anyone with some sort of general PHP and MySQL experience can use WordPress immediately.


15- WordPress keeps getting better.


Because WordPress hires top-notch developers, you can be certain that WordPress is only going to get better as time goes on. Also, because WordPress is open source, any developer can enhance the user experience so that it can become the best CMS available.

WordPress is a tool intended to make your website quick and easy to operate. It takes the focus away from the technical aspects of running your website and moves it to the important stuff like what’s ON your website.
WordPress can be one of the best platforms for your business.

Make Personal Twitter Website Using Wordpress


How To Create Personal/Private Twitter Site Using Wordpress

With the incredible popularity of Twitter theses days, many people are thinking about how can they create their own Twitter-like network for their family, friends or company. This may be a lot easier than you think. In this tutorial, Using WordPress,  I’m going to show you how to do it easily, 

GETTING READY

Twitter success is the proof, microblogging is definitely something useful and efficient. It can help you staying tuned with friends, family or coworkers


While Twitter is great, it may not be the best choice if you’re looking for a private network, for example for sharing work tips with colleagues, or notice your familly about what’s up. As I was searching for an easy and quick way to create a private microblogging website, I stumbled upon an open source app called laconi.ca, which was created to allow people to launch their own private “Twitter like” microblogging sites. I didn’t really liked it and it was a total pain to install.


After this not so good experience, I decided that WordPress should do that job, and do it good as always.
Personal/Private Twitter Site Using Wordpress


LET’S DOING IT

Well, enought talk for now! Let’s create our own, private microblogging website using our beloved WordPress.


1. INSTALLING WORDPRESS

If you are already install wordpress then skip this step, if you not yet install Wordpress then the first thing to do is obviously to install WordPress on your server. Installing WordPress is definitely easy and and I’ll not explain it here due to the incredible amount of tutorials you can find on the internet. If you need help for installing WordPress, you should read the documentation. Or even better, you can register at WpWebHost, the WordPress hosting experts, and use Fantastico to get your WordPress installed automatically in a minute. Just click here if you want to know more.


2. GET YOUR COPY OF THE P2 THEME

The guys from Automattic (The company behing WordPress) released, some time ago, a very cool WordPress theme for social microblogging. The theme is called P2 and you can get it for free here.

After you downloaded P2, simply uncompress the archive and upload it to the wp-content/themes directory of your WordPress install. Once done, login to your WordPress dashboard and go to “Appearance”, “Themes”. Slect the P2 theme and activate it.

Wordpress  social microblogging Theme.
That’s easy as that, you have sucessfully installed P2 and you’re ready for social microblogging.


3. WHAT ABOUT A LOGIN FORM?

Althought the P2 theme itself is very good, it is possible to enhance it even more. As P2 allow users to post directly from the frontpage, without visiting WordPress dashboard, a good idea should be to integrate a control panel in the theme sidebar.


Our control panel will do the following:
If the user isn’t logged in or have no account yet: We’ll display a login form as well as a link to register, so the visitor can create his account.

If the user is already logged in: We’ll display a link to logout as well as a link to account options, so the user (Even if (s)he doesn’t know much about WordPress) can easily update his/her profile.


To integrate a login form in your theme sidebar, simply open the sidebar.php file and paste the following code:

<li>
  <?php global $user_ID, $user_identity, $user_level ?>
  <?php if ( $user_ID ) : ?>
    
    <h2>Control panel</h2>
  <ul>
    <li>Identified as <strong><?php echo $user_identity ?></strong>.
    <ul>
    <li><a href="<?php bloginfo('url') ?>/wp-admin/">Dashboard</a></li>

   <li><a href="<?php bloginfo('url') ?>/wp-admin/profile.php">Profile and personal options</a></li>
   <li><a href="<?php bloginfo('url') ?>/wp-login.php?action=logout&amp;redirect_to=<?php echo urlencode($_SERVER['REQUEST_URI']) ?>">Logout</a></li>

         <?php
         if (is_single()) {?>
           <li><a href="<?php bloginfo('wpurl');?>/wp-admin/edit.php?p=<?php the_ID(); ?>">Edit Post</a>
           </li>
         <?php } ?>

 </ul>
 </li>
 </ul>

  <?php elseif ( get_option('users_can_register') ) : ?>
    <h2>Identification</h2>
    <ul>
      <li>
  
      <form action="<?php bloginfo('url') ?>/wp-login.php" method="post">
      <p>
        <label for="log"><input type="text" name="log" id="log" value="<?php echo wp_specialchars(stripslashes($user_login), 1) ?>" size="22" /> User</label><br />
        <label for="pwd"><input type="password" name="pwd" id="pwd" size="22" /> Password</label><br />
<input type="submit" name="submit" value="Login" class="button" />
        <label for="rememberme"><input name="rememberme" id="rememberme" type="checkbox" checked="checked" value="forever" /> Remember me</label><br />
</p>
        <input type="hidden" name="redirect_to" value="<?php echo $_SERVER['REQUEST_URI']; ?>"/>
      </form>
  
      </li>
      <li><a href="<?php bloginfo('url') ?>/wp-register.php">Register</a></li>
      <li><a href="<?php bloginfo('url') ?>/wp-login.php?action=lostpassword">Recover password</a></li>
    </ul>
  
<?php endif; ?>
</li>


4. MAKING YOUR NETWORK PRIVATE

While the login/register form option can be good in some case, it will still allow people to read your discussions and search engines to index your content. If your need is a 100% private website, don’t worry. This is far from being a problem.

To do so, we’ll use a WordPress plugin, named Private WP. Get your copy here. Once you have it, extract the archive on your hard drive and upload the private-wp to the wp-content/plugins directory of your WordPress install. Then, simply login to WordPress, go to the dashboard, then to “Plugins” and activate the plugin.

That’s all you have to do. Now, your website will automatically detect logged in users, who’ll be able to read and post content, and unknown visitors, who’ll be automatically redirected to WordPress loggin panel.
wordpress login page


CONCLUSION

The first thing which have to be said is that, one more time, WordPress show how extensible and powerful it is. If you’re familiar with WP, creating this “Twitter-like” site using the P2 theme should not take you more than 30 minutes. Isn’t that great? I’ll not say that I love WordPress, because all of you already know

This tutorial was focused on making a private microblogging site and used only basic techniques, but there’s a lot of other interresting things that can be done in order to enhance this “Twitter-like” site. For example, you may want to create a page template listing all members, or even better, filtering posts to see only those posted by a selection of members?
Maybe we’ll see that in a future tutorial, if you enjoyed this one.

5 Most Wanted Tips


5 Most Wanted Wordpress Tips

5 Most Wanted Wordpress Tips

There are times when you come across a feature in a blog, and you just start thinking to yourself: How can I get this in my WordPress blog/site as well. Everybody have experienced this feeling. Sometimes you know you want it, and don’t know where to look for, or even what to look for. In this article we will be sharing some of the most wanted WordPress Tips, Tricks, and Hacks that you will definitely find useful.

These tutorials are classified under various skills level. For some tutorials, you will need to know basic HTML and some WordPress Knowledge. Use the link below as one of your resources:

1- How to Displays Random Posts on Page


Maybe you have been seen on blogs this cool feature? They have a link in their top navigation to something like Stumbe! or Read Random Articles, or some other creative text. When you click on that link, it takes you to a page that displays one random page. Each time you refresh, you are delivered with a new post. Well this trick is just for you then.
You would need to follow the trick #1 in this article to create a custom page Themes. And simply paste this code in there:


    <?php
    query_posts(array('orderby' => 'rand', 'showposts' => 1));
    if (have_posts()) :
    while (have_posts()) : the_post(); ?>

    <h1><a href="<?php the_permalink() ?>"><?php the_title(); ?></a></h1>

    <?php the_content(); ?>

    <?php endwhile;
    endif; ?>

This is a simple WordPress Loop that is running a query to display random posts and the number 1 in there is telling WordPress to only show 1 post. You can change that number, but most of the time people do it one post a time.


2- Author’s Comment Highlight

Author’s Comment Highlight

May be you have seen this on blogs where author’s comments are grand from other comments? You know how it is? Well this is a simple and easy trick.

First of All you need to Edit your style.css in your Themes folder and add the following:
 
.authorstyle { background-color: #B3FFCC !important; } 

Then you need to Edit your comments.php which is also located in your themes folder and find the code that looks some what like this:

<li <?php echo $oddcomment; ?>id="comment-<?php comment_ID() ?>"></li>

Replace it with:

<li class="<?php if ($comment->user_id == 1) $oddcomment = "authorstyle"; echo $oddcomment; ?>"></li>


Note you must change 1 to the user id of the author. Once you do this, your blog comments will have a different background for the author’s comment compared to the rest.

3- As Text Display Twitter Follower Count


There are users who absolutely hate buttons like Feedburner buttons or Twittercounter buttons. Are you one of them? Do you want to display your twitter count as text, so it blends in to your new custom design? Well then this hack is just for you.
First you would need to create a file twitter.php and paste the following code in there:


<?php
$tw = get_option("twitterfollowerscount");
if ($tw['lastcheck'] < ( mktime() – 3600 ) )
{
$xml=file_get_contents('http://twitter.com/users/show.xml?screen_name=wpbeginner');
if (preg_match('/followers_count>(.*)</',$xml,$match)!=0) {
$tw['count'] = $match[1];
}
$tw['lastcheck'] = mktime();
update_option("twitterfollowerscount",$tw);
}
echo $tw['count'];
?> 


Make sure to replace wpbeginner with your twitter name.
Then Simply place this code anywhere you want to display this:

<?php include("twitter.php"); ?>

4- Change the Default Gravatar Button

The Default Gravatar Button

Say Good bye to default gravatar image The default gravatar image is really annoying for most users. Plus if you have one more chance of branding your blog, then why not do it. Changing your default gravatar lets you brand your blog more. With this snippet below you can change your default gravatar.


First you need to open your functions.php which is located in your template folder. If you don’t have one then create one and insert the following code:

    add_filter( 'avatar_defaults', 'newgravatar' );

    function newgravatar ($avatar_defaults) {
    $myavatar = get_bloginfo('template_directory') . '/images/gravataricon.gif';
    $avatar_defaults[$myavatar] = &quot;WPBeginner&quot;;
    return $avatar_defaults;
    }

In the code the image is being extracted from the theme directory and it is called gravataricon.gif obviously you will change it to your image name. Where it says Wordpress-tools.xyz, that is the name of the avatar of how it will show in your admin panel options area.

Say Good bye to default gravatar image

Head over to your admin panel and click Settings > Discussion and change the icon, and now you have a branded comment area with your logo.


5- Display Random Header Images in WordPress


Most blog designs get boring if they have a huge header picture and it is static. This is when this tutorial comes in to make your header images dynamic because it rotates on each visit. You can select as many images as you want to rotate randomly. It brings life to a blog.

First you need to name your images in this format:

  •  headerimage_1.gif
  •  headerimage_2.gif 
  •  headerimage_3.gif

You must separate the name with an underscore. You can change the headerimage text to himage or anything you like.

Once you have done that paste the following code in your header.php where you would like the images to be displayed or in any other file.

<img src="http://path_to_images/headerimage_<?php echo(rand(1,3)); ?>.gif"
width="image_width" height="image_height" alt="image_alt_text" />

Make sure that you change the number 3 if you decide to do more than 3 images.
This code is not exclusive for WordPress, it will work with any php based platform.

6 Best Forum Plugins for WordPress

Best Forum Plugins for WordPress


6 Best Forum Plugins

I’m a big advocate of building community on your website. It falls in line with that whole social networking, thought leadership stuff that’s so important and so effective right now. Of course, when you’re first setting up a WordPress site for yourself or a client, it can be daunting to know which route is the best to pursue in terms of choosing a platform for engagement.

You can have your social media profile links and your share buttons. You can encourage blog comments. But if you want to foster real discussion that stays on your site your best bet is to add a forum.

Before you wonder off cowering in fear, allow me to ease your mind. You don’t need to know a lick of code to add a forum to your WordPress site. No, all you need to be able to do is install a plugin (or theme) configure the settings to your specifications, and get someone in charge of moderating the thing. Otherwise, it’s easy peasy.

Building online forums requires a lot of patience and sometimes more than average technical knowledge. For beginners this usually means learning a new software system from the ground up. What if we told you that you can build a robust online forum within your familiar WordPress CMS? In this article, we will show you the best forum plugins for WordPress.

1. bbPress

bbPress the best WordPress forum plugin


Beloved by nearly everyone who gives it a shot, bbPress is one of the top WordPress forum plugins out there right now. Once installed, it adds several options to your dashboard for creating and managing a forum. It fully integrates itself into your site so it doesn’t feel out of place and you can easily manage forum topics and replies just as you would Core settings.

When it comes to integrating a forum into WordPress, bbPress is handsdown the best plugin for the job. It is built the WordPress way and uses the existing WordPress core to power your forum.We have a tutorial on how to set up bbPress in WordPress.


You can also import forum posts from many other forum tools, which means you’re not tied down to one forum solution for the rest of your life.

Pros

  • Built for WordPress, bbPress utilizes the same WordPress core and follows the same coding standards as WordPress. 
  • Integrates with any WordPress theme without any painful modifications.
  • Nearly a 100+ plugins available to do just about anything you want. 
  • Since it does not have a lot of bloat, bbPress is fast and lightweight.

Cons

  •  Not as feature rich as full fledged forum CMS like phpBB, Vanilla Forums, vbulletin.


BuddyPress the best WordPress forum plugin

Another forum plugin you’ve likely heard of before is called BuddyPress. It’s feature-rich and makes it easy to add a variety of social network features to your WordPress site without having to use ten thousand different plugins. It’s made by the WordPress crew, too so the code is clean and secure.

Its allows you to build your own social network with in WordPress. Just like bbPress, It is also an official WordPress plugin. It follows the same coding practices and standards as WordPress.

Pros

  • Easily integrates into any WordPress Theme. 
  • Plenty of plugins to extend the functionality.
  • Creates activity streams, user profiles, social connections, groups, etc. 
  • Add a points system to ignite user engagement.

Cons

  • It could be quite challenging to move a BuddyPress site to some other platform.
  • It is not as well documented as WordPress and finding help can be difficult.

WP Symposium the best WordPress forum plugin


WP Symposium is an alternative to BuddyPress. It includes social networking features integrated into groups and forums.
Though typically billed as a social media plugin, WP Symposium is yet another way to add a forum to your WordPress site. And man is it loaded with features! The free version is quite robust and lets you add a forum to your site using a shortcode. You can setup multiple forums if you want by using categories. This way, you can restrict user access if you want based on user role.

Pros

  • Easily integrates into any WordPress Theme. 
  • Plenty of plugins to extend the functionality.
  • Creates activity streams, user profiles, social connections, groups, etc. 
  • Add a points system to ignite user engagement.

Cons

  • It could be quite challenging to move a BuddyPress site to some other platform.
  • It is not as well documented as WordPress and finding help can be difficult.

CM Answers - Building a Questions and Answers Forum With WordPress


CM Answers allows you to build a Q & A community on your WordPress site. The basic free plugin comes with enough features to quickly set up a Stack Exchange like forum on your website.
If you want a more robust question and answer forum on your site, CM Answers is the obvious choice for accomplishing this. It’s built on a Stack Overflow discussion board so users can ask questions and other users can respond with their answers. Members of the community can then rate the answers to help improve the overall accuracy and effectiveness of your forum. There’s a free and premium version available.

Pros

  • Integrates seamlessly with most WordPress themes.
  • Users can vote on questions and answers.
  • Premium version has a lot more features including the ability to choose best answer, profiles, comments, social media login, etc.

Cons

  • Your forum is limited to Question & Answer format.
  • Most useful features are available for the premium version.
  • Some reviews on the plugin’s page indicate that users found it difficult to use.

DW Question Answer Plugin for WordPress

DW Question Answers allows you to create a question answer site with WordPress.

DW Question & Answer is a simple plugin that lets you create a question and answer site in WordPress. This can serve as a useful support forum for your customers, a robust FAQ section, or a way for members of your site’s community to pose questions to one another and respond with answers directly.

Pros

  • Allows question categories and tags. This gives your site an SEO boost with user driven content.
  • Users can vote and comment on answers.
  • CAPTCHA support helps you combat spam.
  • Can be used as support forum.

Cons

  • Your forum is limited to Question/Answer format.


6. AnsPress

AnsPress Plugin for WordPress

If the Q&A format is your thing, then AnsPress might be a good free option for you to try out. It’s really simple and not as complex as some of the other question and answer style plugins I’ve covered here (like CM Answers, for instance) but it still gets the job done and has a lower barrier of entry for those unfamiliar with customizing WordPress.
Once installed, this plugin adds a Question and an Answer option to your main admin menu and a dedicated Settings page. If you want to customize the look to match your theme you can but it looks pretty nice right out of the box, if you ask me. It has a lot of the same features we’ve already discussed here like the ability to edit questions and answers, flag for spam, and vote for your favorite answers.


Pros

  • Include built-in moderation
  • Question labels, question tags, categories and tag suggestions
  • Private message, email notifications, and a variety of user levels

Cons

  •  Not as feature rich as full fledged forum CMS like phpBB, Vanilla Forums, vbulletin.

We hope this article helped you find the best forum plugin for WordPress.
As we said earlier, building an online community requires patience and consistency among other technical requirements. We wish you best of luck with your new forum.

Getting Perfect Domain Name Tips for Your Blog Setup

Getting Perfect Domain Name Tips for Your Blog Setup

The first thing that comes to my mind when setting up a blog is getting a good domain name. In this article, I have described why I think it is important to choose a good domain name upfront. I have also explained how you can pick a good domain name for your blog or website followed by some domain name picking tips and general outlines (“dos” and “don’t s”).

Perfect Domain Name Tips

Why pick a good domain name for your blog?

Apart from many other reasons, you want to pick a good domain name for your blog/site from the start, because most likely you will be stuck with that domain name for the rest of the blog’s life. You may change the domain hosting provider from time to time depending on how reliable your current domain hosting provider is but the domain name will remain the same.
The reason I say that you will be stuck with that name is mainly because changing the domain name is kind of like starting all over again from the start and you don’t want to do that once your site is established and getting regular traffic and you have built up a brand. You will start with ‘0’ Google Page rank and will have to work your way up again if you do change the domain name in the middle. The Alexa rank and other ranking metrics will drop too because all these rankings are associated with the domain name. So the bottom line is that you want to pick a good domain name that you can live with from the start. Now, the question is how?


How to pick a good domain name for your blog?

I don’t think that there are any hard rules as to how a domain name should be picked, so use the following points as a guideline for choosing your domain name:

  • Use Keywords: Use keywords in the domain name that describe your site (if it makes sense). The domain name should suggest the nature of your product or service. A good domain name describes exactly what the site is about. It is important for a visitor to get an idea of what the website is about just by looking at the domain name. For example, if your site is about antiques and collectibles then try to get a domain name like “www.antiques.com” or “www.collectibles”.com not “www.foobar.com”.

  • Easy to remember: A domain name should be easy to remember becuase your visitors will want to type in the domain name in the web browser for revisits and if they can’t remember the domain name then you run the risk of losing potential traffic. It is also easier to spread the word of mouth when the domain name is easy to remember.

  • Keep the domain name short: A domain name should be short with less than 10 characters. It also helps the “Easy to remember” point when the name is short. Although, these days it’s incredibly hard to get domain names that are short. Basically you don’t want to end up with a super long domain name like “www.thisisareallybadexampleofdomainname.com”. When the name gets too long it gets confusing and the name can be easily mistyped in the browser.

  • Use hyphens if needed: Use hyphen (-) in between the words if needed for your domain name. If “www.domainname.com” is taken then you can try “www.domain-name.com”. Using hyphen(s) in between the words sometimes help to improve readability. It can also help in the Search engine rankings.

  • Make it easy to type: Try to get a domain name that is easy to type (if you can). Easy to type domain names are good for branding.

  • Think Local: If your business is local then think about adding your region, city or state in the domain name (example: VegasAccounting.com). Only do it if it makes sense though.

  • Domain name extension: Try to get the “.com” Top Level Domain (TLD) extension as it is the most popular. It is also the most widely accepted domain name extension. When people think about an website, their mind automatically pictures “domain-name.com” as the address. You can also use the “.net” and “.org” extensions if you cannot find a “.com” extension.


Some General things to be aware of

  • Legal conflicts: Spend a bit of time searching around to make sure you are not choosing a domain name that is similar to an already established rival. You don’t want to spend time building your blog only to find out that someone else has a similar website and wants to sue you.

  • Avoid Copyright Issues: Make sure the name you are going to use is not copyrighted.

  • Be aware of the scammers: There are a lot of scammers around, so try to make sure you buy your domain name from a registrar who is in the ICANN’s (Internet Corporation for Assigned Names and Numbers) accredited registrar’s list.

As I have mentioned earlier that these rules are not set in stone. Don’t be afraid to add your own flavor. Use common knowledge and be sensible. Try your best and get creative. What is your best tip in choosing a good domain name? Feel free to leave your suggestions or comments below.

Top 5 Free Plugins to Super Charge Your WordPress Blog’s Speed

According to an article published at the Kissmetrix blog, 40% of the users quit the websites that takes more than 3 seconds to load. Considering you run an online business or run a blog, 40% is a serious metric to deal with (or to avoid either). One can’t just let go of those 40% users. Ironically, despite being so vital, loading time is often ignored. To run a website online efficiently, and to maximize conversions you need to tweak up your website’s loading times. Due to the fact that a large number of websites use WordPress, In this post I’ll break down five plugins that help you speed up your blog.

Top 5 Free Plugins to Super Charge Your WordPress Blog’s Speed

Before you begin, I suggest you take a test of your Website’s Speed test on pingdom tools. To begin, Visit Pingdom Tools, and Enter your Website’s URL and hit “Test Now“. A quick test would reveal you the factors that might be holding back your blog’s performance. From the pingdom report, you can see which plugins effect your blog speed more. Once you have finished, you can start working and tweaking up your blog.

Top 5 Plugins to Super Charge Your WordPress Blog’s Speed

[Tweet “Super Charge Your WordPress Blog Speed With These Free Plugins”]

1 - WP Super Cache


There are dozens of caching plugins in the WordPress plugin repository.
There are premium plugins for caching as well, however WP super cache stands as the most used plugin for caching. FYI, it is free of cost as well !

WP Super Cache


If you aren’t familiar with caching, let me break it down for you.
When a user visits your website/blog, a copy of your website’s that particular page is downloaded temporarily in his browser cache and cookies.

 Considering the fact that the reader visits your blog again, his browser would have to re-download all the resources again. To save all this hustle, webmasters suggest the use of “Caching“. Under this, resources once download are stored in cache to enhance user experience.


Download


2 - WP Minify

CSS ( Cascading style sheets ) files, and JS ( Javascript ) files have a great impact on your blog’s loading time.

WP Minify


When it comes to WordPress, the problem gets to next level. That is because several plugins come with separate CSS file and Javascript files.

 You can sort things out by using WP Minify plugin. This plugin once activated minifies CSS and JS files to speed wordpress website.


Download


3 - JS and CSS Script Optimizer

Another plugin you would find helpful for speeding up the performance of your wordpress installation is JS and CSS script optimizer.

JS and CSS Script Optimizer

This plugin takes up a different aspect to cut down on your loading times.

 It combines all your theme, plugin’s CSS files and JS files into one and minifies them for minimum load time. I’ve tested it on several blogs and it worked on most of them.

 It can cut down loading times to a great extent if you have a lot of plugins installed. The plugin also has an option to has a feature for you to add CSS and JS files on your own.


Download


4 - WP Optimize

WordPress is a database based CMS ( Content management system ). Not only its database stores records of your posts, pages, comments and similar things. It also keeps a record of any possible change you do while playing with your blog.

WP Optimize

This can include changing themes, plugins, post revisions and much more. Over the passage of time, this data grows to be huge and gets to be a problem.


This is where WP optimize comes to your rescue. It helps you optimize your database, clean auto drafts, remove spam comments and much more.

Download


5 - Smush it

Images too take up a large part of your wordpress directory. This might not serve as a problem in the starting, however, as the blog grows, it can be a heck of thing to deal with.

Smush it

You can’t just go ignoring images in your blog. They help you explain the topic easily and makes it more easy for the readers to understand.

We are also aware of the fact that how popular are infographics. This makes it essential to optimize images for best performance.

The plugin helps you optimize your images from inside the WordPress dashboard. It automatically optimizes the images on the go as you upload them on the go.


Bonus plugin : Before finishing this list, I want to drop another plugin. It is Plugin Security Scanner, a free plugin that scans your plugins for security loop holes. Why you need this plugin ? It is a mere possibility that a plugin you use might have vulnerabilities. These can include malware, loop holes and similar things. The plugin scans your installed plugins for such vulnerabilities that might be effecting your blog’s speed.

Conclusion - Speed is one of the most essential elements that can make or doom a blog.

Here is something I’d recommend. If you checked your blog’s speed before installing the plugins, try checking your blog’s loading time again after installing and configuring these plugins. You are welcome to share your results in the comments below.

Now, there are certainly more plugins than what I mentioned in the post. If you use any plugin to speed up your blog, tell me in the comments below, I’d love to include it in the list.
-->